- Home
- Personal Banking
- Small BusinessSmall Business Banking Small Business Overview Small Business Checking Small Business Credit Card Small Business Savings Small Business Online BankingMerchant Services Merchant Services
- Commercial
- Community
- Knowledge CenterCalculators Auto Calculators Credit Calculators Home & Mortgage Calculators Retirement Calculators Savings CalculatorsSecurity & Privacy Center Card Security Fraud Prevention ID Theft Online and Mobile Security Security Posts
- Search
- Login
Welcome, log in to Online Banking
![]()
![]()
Important Notice
You are accessing a secure site with confidential information which is restricted to authorized persons only. Unauthorized access or use is not permitted and constitutes a crime punishable by law. Violators will be prosecuted to the fullest extent of the law.
Bill Pay Help
- New CheckFree Bill Pay User
- Bill Pay Terms & Conditions
- Scheduling the Payment
- Atypical Payment Warning
- Duplicate Payment Error Message
- Payment Confirmation
- Scheduled Payments
- Flexible eBill Payments
- Updating Biller Information
- Modifying a Bill – Security Enhancements
- Activity Tab
- Setting Up and Deleting Bill Reminders
- Scheduling Automatic Payments (Autopay)
- Setting Up Automatic Payments for Electronic Bills
- Bill History
- Sorting Bill History
- Viewing Bill Detail
- Bill Detail for eBills
- Filing an eBill
- eBill Download Functionality
New CheckFree Bill Pay User
If you are a first time user of Bill Pay, follow the steps below to enroll:
- Once login to Online Banking is complete, click on Bill Pay tab
- Read the Online Banking Notifications page click Continue to Online Banking
- Read and click I Agree for the Bill Payment Terms & Conditions.
- Click Submit
- The Online Banking tabs will appear, click on Add a Bill
- Follow the steps to add the bill
Bill Pay Terms & Conditions
- The Bill Pay Terms & Conditions display when you first choose the Bill Pay tab in Online Banking. You will have to read and accept the Terms & Conditions to set up Bill Pay.
- Once you have signed up for Bill Pay, the Terms & Conditions are found after clicking on the Bill Pay tab on the main screen. The link is found right under the Bill Pay tab.
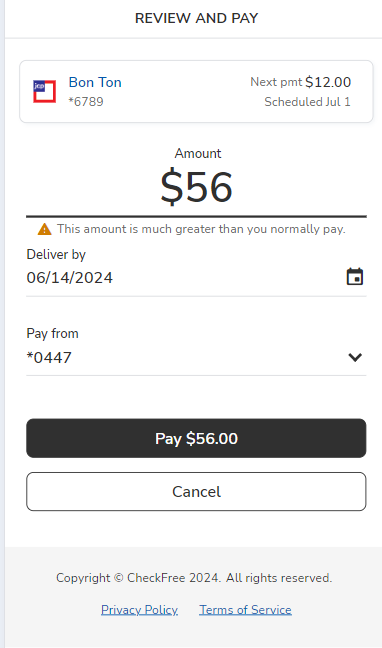
Scheduling the Payment
- Select the biller you'd like to make a payment to.
- Enter the amount and date you'd like the payment to be sent based on the dates available.
- Add memo (optional).
- Select Pay.
Atypical Payment Warning
A new alert message will display to warn that a payment amount is significantly more or less than your typical payment for a bill. The alert is displayed when the average payment amount for the last six months varies from the current payment by a factor of ten. (For example, if a user types $150.00 rather than their normal payment amount of $15.00, the shown warning will be presented to alert the user to a potential error.)
Duplicate Payment Error Message
If a duplicate pending payment is already set up for a particular biller you will receive an error message. You will be required to change requested amount or date for payment to be processed.

Payment Confirmation
Once you select the Pay button, you will see a Payment Confirmation page. From this page, you can do the following:
- Print the page for the payment you just scheduled.
- Add a note to the payment.
- A payment note can be added to any payment in a 256-character field. Payment notes are your personal use within the application and will not be printed on any checks or remitted to the biller. Payment notes are viewable from the Bill Detail screen.
- Make sure to select "Save" to preserve the note.
- Write down the confirmation number for the payment.
- Request an eBill if the biller offers this function.
- Set up an Automatic Payment for the biller (You can also perform this function from the Activity tabs page).
Scheduled Payments
- Once you have scheduled your payment, it appears on the Activity tab under the Scheduled section.
- You can change or cancel the payment from this section by selecting the arrow on the far right, or you can change or cancel it from the Biller Details page by selecting the payment under Biller activity..
If you choose to edit the pending payment, the following information can be edited:
- Amount
- Pay date
- Bank account information (if more than 1 payment account is available)
Once you save your changes, you will receive a new confirmation page showing the changes.
Once the payment has started processing, “Processing” appears as the status in the Recent Activity mini section, advising you of this change.
When the payment shows Processing, no changes can be made.
You can now search, filter or sort your Scheduled Payments by Biller Name or Date. To arrange by Biller Name or Date, select the Filter icon, choose your settings and select Apply.
Flexible eBill Payments
You are able to schedule a payment for various amounts relevant to a delivered eBill, including:
- Minimum Amount Due
- Amount Due
- Account Balance
- Other Specified Amount
While the payment is in “Scheduled” status, you can edit the payment prior to processing.
The specific amount options offered to you will vary, dependent upon which information is provided by the biller for a given eBill.
Updating Biller Information
Pay Bills Tab
When you click the Edit Biller link under Biller Details, a new page appears allowing you to update information for the biller. The amount of information you can change depends on whether or not the biller has a managed relationship with Fiserv.
Modifying a Bill – Security Enhancements
An anti-fraud email confirmation message is sent to you if the biller name, biller account number or biller address has been changed.
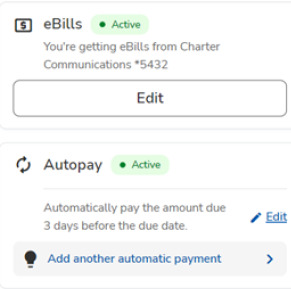
Activity Tab
The Activity tab assists in setting up and managing each biller. Edits, such as adding an automatic payment, updating biller information and setting up reminders can completed from this single view for any biller.
When the biller is selected, there will be options for that particular bill. For instance, some companies may have eBills and some may not. For eBills already created, you may:
- Add an electronic version of my bill (which would mean getting eBill)
- Stop/Delete electronic version of my bill (which would cancel eBill)
- Update biller information – if the biller can be updated, the option will be available; if it cannot be updated, it is due to the fact CheckFree has a relationship with that company and guarantees the payment will get to the correct address (managed biller).
Setting Up and Deleting Bill Reminders
Bill reminders allow you to establish due dates for your bills and receive notifications or alerts via email when bills are due.
If you have eBills selected, you will also be notified when the bill is due.
If you are receiving an eBill, it appears in the Unpaid bills section as soon as the bill is received from your biller. When a bill is past due, the reminder appears in red. Past due reminders typically disappear five (5) days after the bill’s due date. eBill reminders will remain in the mini-module until they are filed.
To dismiss a bill reminder, go under Bill Details and select Dismiss in the Reminder section. If you have the biller set up as an eBill, you can select to no longer receive the bill electronically if you do not want to be reminded.
Scheduling Automatic Payments (Autopay)
Automatic Payments can be enabled for billers that are activated for eBills and for billers paid on a recurring basis. Automatic payments are set up from the Pay Bills tab or via the Activity tab. The type of automatic payment that is set up depends whether or not you are receiving eBills.
If you have paid the biller the same payment amount three months in a row, the system recognizes this and asks you if this is your regular payment amount.
The Autopay Confirmation page appears once it's been set up.
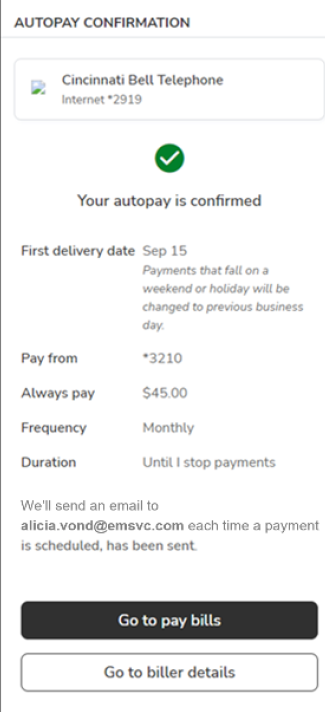
Setting up Automatic Payments for Electronic Bills
Once the repeating automatic payment for the eBill has been enabled, the word Active will display next to Autopay on the Biller Details page.
Bill History
The Bill History section allows you to review your payments and eBills for 24 months.
Sorting Bill History
There are different ways you can sort your bill history:
- Biller name
- Status
- Date range
Viewing Bill Detail
To view details for a particular payment or eBill, select the bill from the Pay Bills page. From the View Payment page, you can:
- Print the history for the payment
- Determine when your funding account was debited
- Determine when the biller is scheduled to receive the funds
- If available, view when the biller posted the payment to your account
Bill Detail for eBills
If you access the View Payment screen for an electronic bill, you will be able to:
- View the check status
- View the status of the eBill
- File the eBill
Filing an eBill
You have the ability to file an eBill. If you file the eBill, then later wish to schedule a payment, you must do so from the Pay Bills page.
You can also file the eBill from the eBill Summary screen, which is accessible from the Payment Center.
eBill Download Functionality
You can download and save a copy of your eBill to your computer in PDF format. The download capability is supported at a biller level.
If applicable for that particular biller, a download link is available on the top frame of the Bill Detail screen.
Also included is a link to download the free Adobe® Acrobat® Reader.